In this post I show how to create useful hiking maps by merging OpenStreetMap data with the usually excellent official maps of the cartographic offices of Germany and several other countries. Using MOBAC and Maperitive, a transparent layer containing POIs, landscape features and elevation information is generated from OSM data and then overlayed on the official maps. Also, mapsources for OruxMaps are derived for the various countries.
This time not so much bla bla, but to skip directly to the tutorial, click here.
Updates
June 25th 2017: Added Luxembourg
June 26th 2017: Added Switzerland
July 1st 2017: Added Denmark and the Netherlands
July 2nd 2017: Added OruxMaps mapsources
July 9th 2017: Made the previously experimental rendering the default one. And: Text rendering bug in Maperitive seems to be gone. Removed that bit.
The Goal
While my Media Center blog post makes it clear that watching TV is not among my favorite pastimes, hiking certainly is. To properly plan a tour and to navigate the terrain effortlessly, two things are required: A GPS device, and good maps. While the former nowadays is any smartphone, the latter is not as easy to come by. “But what about OpenStreetMap?” you may ask. While this is certainly a very good source (of which I make heavy use in this project), the general quality depends on the frequency of OpenStreetMappers to be found in a given region. Here’s an example:
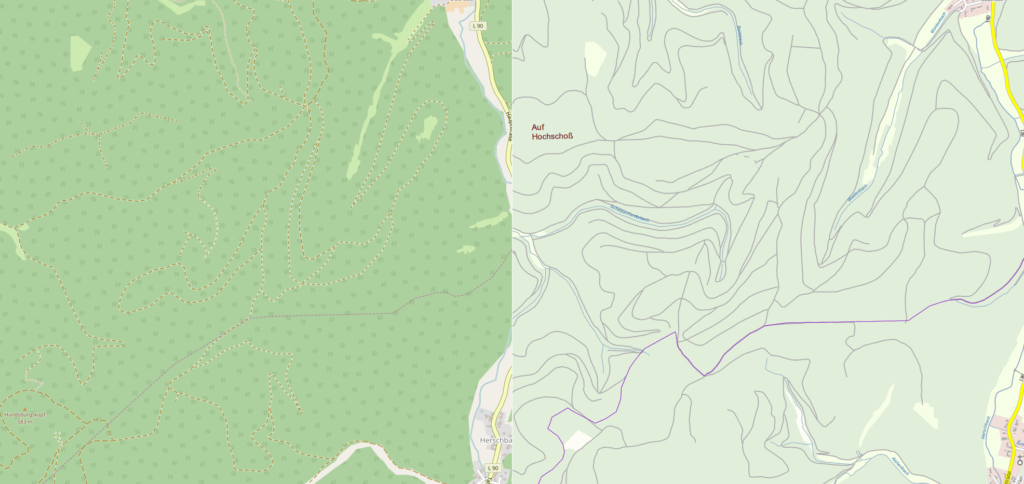
On the left is the standard OpenStreetMap (OSM) rendering, on the right the WebAtlasDE map of the Dienstleistungszentrum des Bundes für Geoinformation und Geodäsie, part of the Bundesamt für Kartographie und Geodäsie – that is the Federal Agency for Cartography and Geodesy. Although the region above in the Eifel is close to densly populated areas and the Eifel is a very popular hiking area, this actual part of the Eifel is surrounded by areas that hold a few more attractions for hikers, so most hikers go there and not here. As a result, many ways are missing in OSM, since noone mapped them.
The WebAtlasDE is based on the “official” surveys done by the federal government office, so the general quality of the data is excellent. And, even more, if you register, the high resolution maps are free to use for private purposes! The access to the maps is possible using a web map service (WMS), tile map service (TMS) or Web Map Tile Service (WMTS) respectively, which is supported by many applications. Really cool!
On the other hand, WebAtlasDE is inferior to OSM in many other regards – again, here’s an example of a far more popular hiking region, around the Drachenfels in the Siebengebirge near Bonn:
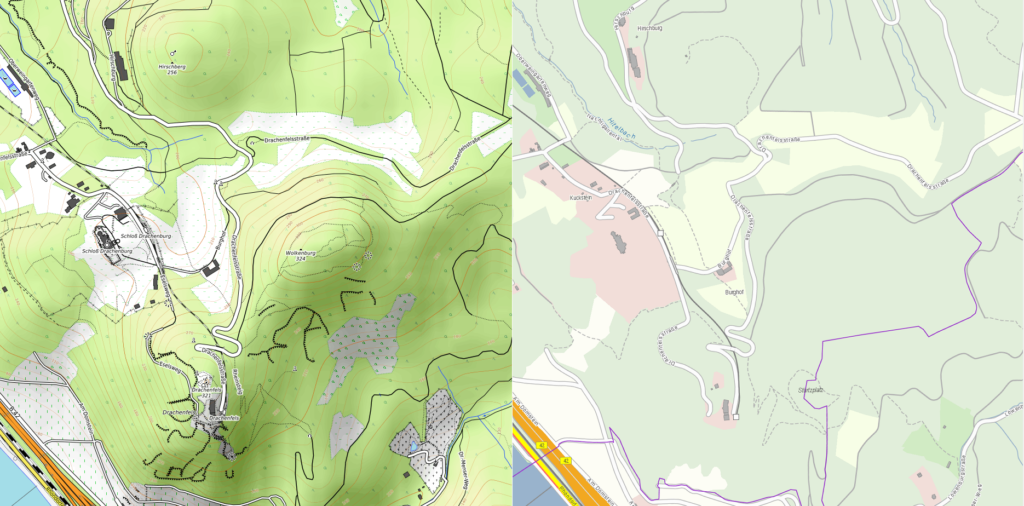
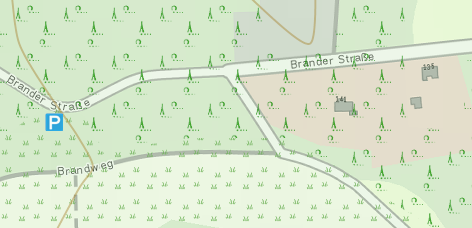
This time I picked the OpenTopoMap rendering of OSM vs. WebAtlasDE. The OSM rendering offers
- Points of Interest (POI) like ruins and viewpoints
- Contour lines
- Hillshading
- Vegetation features
- Landuse (e.g. the vineyards to the lower left or the cemetery to the lower right)
- Landscape features like cliffs
- …
It’s much more feature rich, and many features are really nice-to-have when hiking.
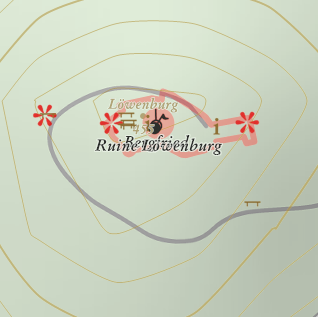
Wouldn’t it be nice to have the best of both maps in just one map? That’s my goal, and I show you how to get there in this post. As a teaser, here’s the same region from above as it looks in my rendering (I actually realize that I picked not the best region – it is that popular that it’s already getting kind of crowded with features):
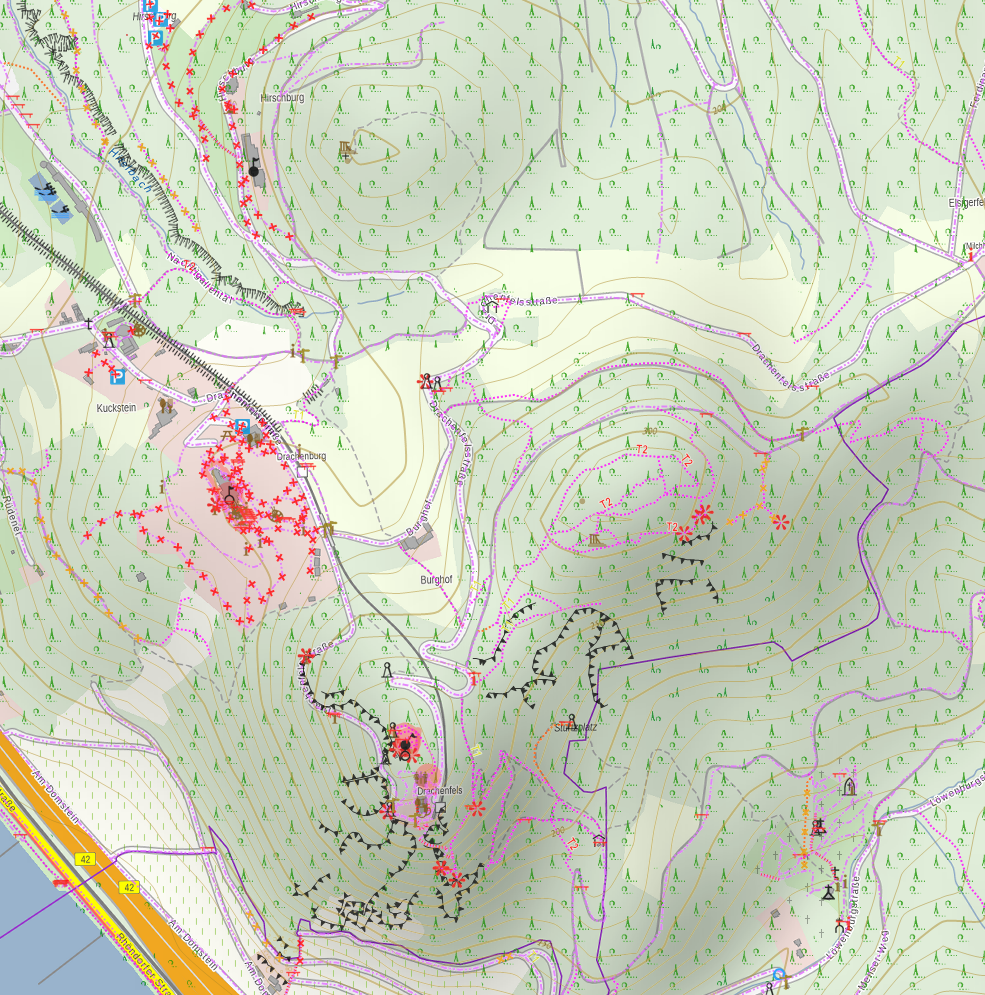
You can see that I’ve a different set of features in my rendering as compared to OpenTopoMap, and that’s the nice thing about the approach – I’ve full control on what I want to have in the map and what not. When you follow this post, you will learn how to adjust this as you like it. You may find the rendering a little bit thick/large on your PC monitor, but when you have it on a small smartphone screen, it’s just right for my taste.
Last remark before we start: Some work presented here was done shortly before a holiday trip and somewhat hasty. You’ll certainly find that the Maperitive configuration file is rather sloppily done and not well structured. Sorry for that – feel free to do it more cleanly! I never could bring myself to make it nicer…
Overview
Here’s the general approach:
- Use Mobile Atlas Creator (MOBAC) to access the WMS of WebAtlasDE and
- create a task in MOBAC that controls
- Maperitive, which downloads and renders OSM data and
- SRTM elevation data into
- a transparant layer containing POI and other features,
- hillshading and contour lines and
- the OSM ways in low-key rendering.
- Use MOBAC again to overlay the transparant Maperitve layer over
- the WebAtlasDE tiles
- and store it into an OruxMaps SQLite database atlas, the
- SUPERATLAS!
![🙂]()
Of course you can replace OruxMaps by your favorite hiking app as long as it is supported by MOBAC.
Important: All map services I mention in this post are provided for free. Abuse of these services may result in blocking actions by the service providers (there are some cases already!). Sometimes MOBAC is blocked (identified by the user agent string). Abuse may also at some point cause the service providers to raise fees. So please use the services in a responsible way, and always adhere to the terms of use each map service states.
Step by Step
MOBAC
The Mobile Atlas Creator is a very cool Java application that allows you download map tiles from various WMS and WMTS into file based databases. These can then be used by GPS navigation apps on smartphones as offline maps. It supports a tremendously large number of apps – just click on the MOBAC link above to check if your favourite app is listed. If you do not have a favourite yet, use the list to try them out and pick one. I personally fell in love with OruxMaps for Android.
If you pick an app, just be aware of one thing: The GPS apps store their offline map data basically in two possible ways: In a folder conatining the several hundred or thousand map tiles, each as a image file, or in a monolithic database, e.g. SQLite or as ZIP archive. I strongly recommend to pick an app following the monolithic approach, since transferring thousands of small files takes very long on most smartphones and uses the SD card quite inefficiently, while a single file database is much, much faster in transfer. The performance impact of getting the correct image from the single file is neglegible on modern phones.
MOBAC has two features that make it perfect for my purposes: It allows you to configure your own, custom map sources, and in that even to overlay several map sources. And it has a tool interface that can be used to control external tools, like in my case, Maperitive.
So here’s a huge thank you to Robert “r_x” for MOBAC – and he does not even accept donations for his work…
In the sense of my how to: Your task is to download MOBAC and unpack it somewhere for later use.
Maperitive
Maperitive is another of the quite unbelivably powerful free tools you find on the net, done by a single author, Igor Brejc. Many thanks to you! Maperitve allows you to download OSM data and render them using a rule set you can define and configure yourself. This rule set is what I use to define which OSM features I want to see in my map and which icons, colors and fonts to use.
Maperitive also has algorithms in it to convert elevation data into contour lines (again configurable via the rule set) and hillshading.
It finally allows you to export the rendered map in various ways, among them a tile set similar to what a WMTS offers, which then can be consumed by MOBAC. And Maperitive may be controled via command line and script files, which allows me to “remote control” it through MOBAC.
Again: Task is to download and unpack it. Like MOBAC, it does not come with an installer, but is a stand alone application (like portable apps) you can start from anywhere where you unpacked the archive.
SRTM Elevation Data
Maperitive needs elevation data for the hillshading and contours, and I think the most popular is the Shuttle Radar Topography Mission (SRTM) data. This exists in a lot of versions from many sources which I found rather confusing. As per documentation Maperitive should download SRTM data automatically, but I never had any success here. This is how it worked for me:
- Create a directory Cache\Rasters\SRTMV3R3 in the Maperitive base directory (if it is not there already).
- Go to viewfinderpanoramas.org’s map selector and click on the region or regions you need coverage of.
- Save the ZIP file(s) somewhere and unpack the .hgt files in the ZIP into the directory created in the first step.
As stated on the homepage of viewfinder panoramas, the service is free for private use. Many thanks to Jonathan de Ferranti! By the way: I think it’s not pure SRTM data, but filled in with complementary data from other missions – the details are on the viewfinder panoramas page.
WebAtlasDE Registration
There is a version of WebAtlasDE freely available on the net, but if you want to use the data in a legal way, you need to register. Since it is free of charge, I can only encourage you to register. From the WebAtlasDE page, select the “Private Nutzung” (private use) button at the bottom of the page. The following pages will ask you:
- Page 1: Which products you want to use (tickmark all)
- Page 2: Salutation (Herr = Mr., Frau = Mrs.), first name, last name and e-mail address
- Page 3: Set tickmark to accept the terms of use and licensing agreement
The latter are given only in German, and I do not feel eligible to give a summary here. Please be sure to find a way to understand the terms in order not to violate them. Clicking “Bestellung absenden” (confirm order) will submit the registration, and as a result, at some point you’ll receive an e-mail that contains a link to confirm the registration – use the link behind “Ihre individuellen Aufrufparameter der bestellten Dienste” (Get your individual access parameters for the ordered services). After that, you’ll receive some more mails which contain several links to the various products and your personal access code, which is actually a GUID, looking somewhat like 123e4567-e89b-12d3-a456-426655440000. This we’ll use later in the MOBAC map source definition.
Optional: Create a Map Source for WebAtlasDE in MOBAC
If you want to view WebAtlasDE without the overlay, you need to create a map source for this. In the MOBAC directory you find a folder named mapsources. In there, create the following file WebAtlasDE.xml:
<?xml version="1.0" encoding="UTF-8" standalone="yes"?> <customWmsMapSource> <name>WebAtlasDE</name> <minZoom>1</minZoom> <maxZoom>17</maxZoom> <tileType>PNG</tileType> <version>1.1.1</version> <layers>webatlasde</layers> <url>http://sg.geodatenzentrum.de/wms_webatlasde__[INSERT YOUR ID HERE]?</url> <coordinatesystem>EPSG:4326</coordinatesystem> <aditionalparameters>&STYLES=</aditionalparameters> <backgroundColor>#000000</backgroundColor> </customWmsMapSource>
Replace the part [INSERT YOUR ID HERE] by the GUID you received after registration. That’s it.
Create Rendering Rules for Maperative
In the Maperative directory there’s a folder Rules. In there are the rule sets which describe the way the OSM data is rendered. There is an introduction to rulesets on the Maperitive documentation page, which is very good and will guide you how to make your own rendering rules. I add some explanations on how I created and fine tuned my rules at the end of the post. Here I’ll just describe what you get when you download and use my Superatlas.mrules. As already said above, this is not the most beautiful piece of configuration file – it was created while learning Maperitive alongside and not having too much time at my hands. Its badly structured, cluttered and, last but not least, uses German words – but it works :-). In the following table I include the German words that I used in the file to allow you to understand and modify the rules. This table is also the legend for my Superatlas, and tells you which OSM data I render into my maps. I wanted symbols that are similar to the German style topographic maps, so I also created a number of icons, which you can download here in a ZIP file. I use them alongside with those already provided with Maperitive. Feel free to use my icons as you like. Just extract the files into the folder icons\SJJB\png within the Maperative directory. In retrospective I should have created my own directory – feel free to do so, but be aware that you need to modify the rules file then.
Superatlas Legend
| Symbol | Meaning | German |
 
|
Castle/Palace
Castle (ruins)/Palace (ruins) |
Burg/Schloss
Burgruine/Schlossruine |
 
|
Church/Monastery
Church (ruins)/Monastery (ruins) |
Kirche/Kloster
Kirchenruine/Klosterruine |
  |
Chapel/Chapel (ruins) | Kapelle/Kapellenruine |
  |
Shrine/Place of worship: Christian | Schrein/Christlicher Ort |
  |
Cross/Waycross | Kreuz/Wegkreuz |
  |
Mosque/Mosque (ruins) | Moschee/Moscheeruine |
  |
Synagogue/Synagogue (ruins) | Synagoge/Synagogenruine |
  |
Place of worship: islamic/jewish | Muslimischer/Jüdischer Ort |
  |
Place of worship/Temple | Heiligtum/Tempel |
 |
Ruins | Ruine |
 |
Gallows, Pillory | Galgen, Pranger |
 
|
Memorial/Monument
Stolperstein (a special kind of memorial for holocaust victims) |
Denkmal/Monument
Stolperstein |
  |
Boundary stone/Milestone | Grenzstein/Meilenstein |
  |
Tombstone/Rune stone | Grabstein/Runenstein |
 |
Survey point | Trigonometrischer Punkt |
  |
Fort/Battlefield | Fort/Schlachtfeld |
 |
City gate | Stadttor |
 |
Historic aqueduct | Aquädukt (historisch) |
 |
Archaeological site | Archäologischer Ort |
 |
Art | Kunst |
 |
Viewpoint | Aussichtspunkt |
 |
Guidepost | Wegweiser |
| Parking lot | Parkplatz | |

|
Restaurant/Café
Pub |
Restaurant/Café
Kneipe, Biergarten |
 |
WC | WC |
 
|
Tower/Observation tower
Communications tower |
Turm/Aussichtsturm
Funkturm |
  |
Lighthouse/Beacon | Leuchtturm/Leuchtfeuer |
  |
Windmill/Watermill | Windmühle/Wassermühle |
  |
Observatory/Telescope | Sternwarte/Teleskop |
  |
Cave/Adit, mine | Höhle/Mine |
  |
Rock/Stone | Fels/Stein |
   |
Broadleaved tree/Conifer/Tree | Laubbaum/Nadelbaum/Baum |
 
|
Information board/Tourist information
Hiking map |
Infotafel/Touristeninforamtion
Wanderkarte |
 
|
Bench/Picnic area
Fireplace |
Sitzbank/Rastplatz
Feuerstelle |
 
|
Shelter/Wilderness hut
Alpine hut/Ranger station |
Schutzhütte/Wanderhütte
Berghütte/Rangerstation |
 |
Bird/Wild hide | Vogel-/Wildbeobachtung |
  |
Spring/Waterfall | Quelle/Wasserfall |
  |
Well/Fountain | Brunnen/Springbrunnen |
 |
Geyser | Geysir |
 |
Tap, Drinking water, Waterpoint | Wasserhahn, Trinkwasser, Wasserpunkt |
 |
Swimming | Badestelle |
 |
Climbing | Kletterstelle |
 |
Deciduous forest | Laubwald |
 |
Coniferous forest | Nadelwald |
 |
Mixed forest | Mischwald |
 |
Forest | Wald |
 |
Scrubland | Buschwerk |
 |
Moor | Moor |
 |
Heath | Heide |
 |
Vineyard | Wein |
 |
Bare rock | Felsgebiet |
 |
Scree | Geröll |
| Glacier | Gletscher | |
 |
Boulders | Felsen |
 |
Precipice | Felshang |
 |
Ridge | Grat |
 |
Embankment, Outcrop | (Steil-)Hang, Aufschluss |
 |
Rampart, Dike | Wall, Deich |
 |
Quarry | Tagebau |
 |
Cemetery | Friedhof |
| Attraction | Sehenswürdigkeit | |
 |
National park | Nationalpark |
 |
Nature reserve | Naturschutzgebiet |
  |
Way/Stairs (See text below) | Weg/Treppe |


 |
Peak, contours | Gipfel, Höhenlinien |
Last thing you need (or need to change in the rules): I use the font GaramondNo8 for any text. It is free to use under the Aladdin Free Public License.
While creating this blog post (really happy I did, since it made me revisit this topic), I thought of rendering the OSM ways in an unintrusive way, so that I still have the WebAtlasDE ways as dominant layer, but can see where OSM might know more than the official maps. I usually also have full OSM map renderings with me, so I can then switch to them and check what kind of way there is. So, any kind of highway, except for motorways and trunks, which are not allowed to be used by pedestrians, are rendered as purple dotted line, regardless of what kind of way it is. Only stairs are highlited, since they are often indicating interesting hiking places.
Integrating Maperitive as External Tool in MOBAC
Next step is to trigger the overlay map tile generation in Maperitive for the map you want to store as offline map database from MOBAC. I include Maperitive as an external tool in MOBAC. This involves
- A DOS batch file that creates
- a Maperitive script file that includes all instructions to generate the map tiles
- and then starts Maperitive using exactly this script.
- In MOBAC, the batch file is incorporated via an XML file.
The XML File
In the MOBAC directory there’s a folder tools. Into that, create a file maperitive.xml:
<?xml version="1.0" encoding="UTF-8" standalone="yes"?>
<ExternalTool>
    <name>maperitive</name>
    <command>cmd.exe /c start [PATH TO]maperitive.bat</command>
    <parameters>MIN_LON MIN_LAT MAX_LON MAX_LAT MIN_ZOOM MAX_ZOOM MAPSOURCE_NAME MAPSOURCE_DISPLAYNAME NAME_EDITBOX</parameters>
    <debug>true</debug>
</ExternalTool>
Replace [PATH TO] by the path to the batch file that we create in the next step.
The Batch File
Create a file maperitive.bat in the directory specified in the last step:
@echo clear-map > autogen.mscript
@echo use-ruleset location=[PATH TO MAPERITIVE]\Rules\Superatlas.mrules >> autogen.mscript
@echo apply-ruleset >> autogen.mscript
@echo set-setting name=map.rendering.tiles.rendering-bounds-buffer value=256 >> autogen.mscript
@echo set-geo-bounds %1,%2,%3,%4 >> autogen.mscript
@echo download-osm-overpass >> autogen.mscript
@echo set-dem-source name=SRTMV3R3 >> autogen.mscript
@echo generate-contours interval=10 >> autogen.mscript
@echo generate-relief-igor intensity=1.25 >> autogen.mscript
@echo generate-tiles minzoom=%5 maxzoom=%6 tilesdir=[PATH TO MAPERITIVE]\Tiles >> autogen.mscript
[PATH TO MAPERITIVE]\maperitive.exe -exitafter [PATH TO MOBAC]\autogen.mscript
exit
Replace [PATH TO MAPERITIVE] by the Maperitive directory (3×), and [PATH TO MOBAC] by the MOBAC directory (1×).
The batch file is started within MOBAC, and MOBAC will pass the arguments specified in the XML from the previous step. The batch file will create a new file named autogen.mscript, which is a Maperitive automation script. In there, the bounding box selected in MOBAC is included, along with the minimum and maximum zoom level selected. The script will then instruct Maperitive to create tiles within the bounding box, and for all selected zoom levels. An example of such an autogen.mscript may look like this:
clear-map
use-ruleset location=D:\Maperitive\Rules\Superatlas.mrules
apply-ruleset
set-setting name=map.rendering.tiles.rendering-bounds-buffer value=256
set-geo-bounds 6.924476623535156,50.386413291217835,7.1596527099609375,50.54289026223802
download-osm-overpass
set-dem-source name=SRTMV3R3
generate-contours interval=10
generate-relief-igor intensity=1.25
generate-tiles minzoom=9 maxzoom=17 tilesdir=D:\Maperitive\Tiles
In detail, the script tells Maperitive to…
- Start from a clear map,
- use the Superatlas rendering rules you downloaded or created before,
- expand the rendering buffer to avoid cut-off text on tile borders,
- set the map area to the bounding box selected in MOBAC,
- download the OSM data from the Overpass API,
- load the SRTM elevation data,
- generate contours and hillshading and
- finally create all the map tiles into the directory Tiles (which you may need to create beforehand).
The last thing the batch file does is to start Maperitive and tell it to execute the autogen.mscript.
Be aware that Maperative will need considerable time to create the tiles!
Some remarks:
- generate-contours interval=10 means that contours are generated for each 10 meters of elevation, but Maperitive will adaptively draw contours only as specified in the rendering rules. The rules may use any multiple of 10.
- generate-relief-igor intensity=1.25: There are several algorithms for hillshading in Maperitive, but I found igor to be the best. Intensity 1.25 is the result of some trying around – I’d like to have it a little bit more pronounced for shallow hills, but if I increase the intensity, real mountains (like the Alps) come out too dark. So 1.25 is the compromise.
Create a Multilayer Map Source in MOBAC
Now having the rendered tiles, the next step is to combine them. MOBAC needs an XML file again in the mapsources directory to define the layers and the transparency of each layer. So create Superatlas.xml:
<customMultiLayerMapSource> <name>Superatlas</name> <tileType>png</tileType> <backgroundColor>#000000</backgroundColor> <layersAlpha>1.0 0.8</layersAlpha> <layers> <customWmsMapSource> <name>WebAtlasDE</name> <minZoom>1</minZoom> <maxZoom>17</maxZoom> <tileType>PNG</tileType> <version>1.1.1</version> <layers>webatlasde</layers> <url>http://sg.geodatenzentrum.de/wms_webatlasde__[INSERT YOUR ID HERE]?</url> <coordinatesystem>EPSG:4326</coordinatesystem> <aditionalparameters>&STYLES=</aditionalparameters> <backgroundColor>#000000</backgroundColor> </customWmsMapSource> <localTileFiles> <name>Maperitive Tiles</name> <sourceFolder>[PATH TO MAPERITIVE]\Tiles</sourceFolder> <backgroundColor>#00000000</backgroundColor> </localTileFiles> </layers> </customMultiLayerMapSource>
This is a multilayer map, first containing the already well known WebAtlasDE, refreneced just by its name, and as second layer the tiles from Maperitive from a local directory. Adjust [INSERT YOUR ID HERE] and [PATH TO MAPERITIVE] to match your GUID and environment. The second layer is set to only 80% opacity (<layersAlpha>), which I find better since the WebAtlasDE shines through the OSM layer a bit, but adjust this to your liking.
In case you created the optional mapsource for WebAtlasDE earlier, make sure its map name is the same as the layer name in the mapsource here. Both will use the same cache in MOBAC, which speeds up things considerably.
Workflow
Now that everything is properly set up, you can start creating offline maps. In order to create the Superatlas offline map for your smartphone, the following steps need to be taken:
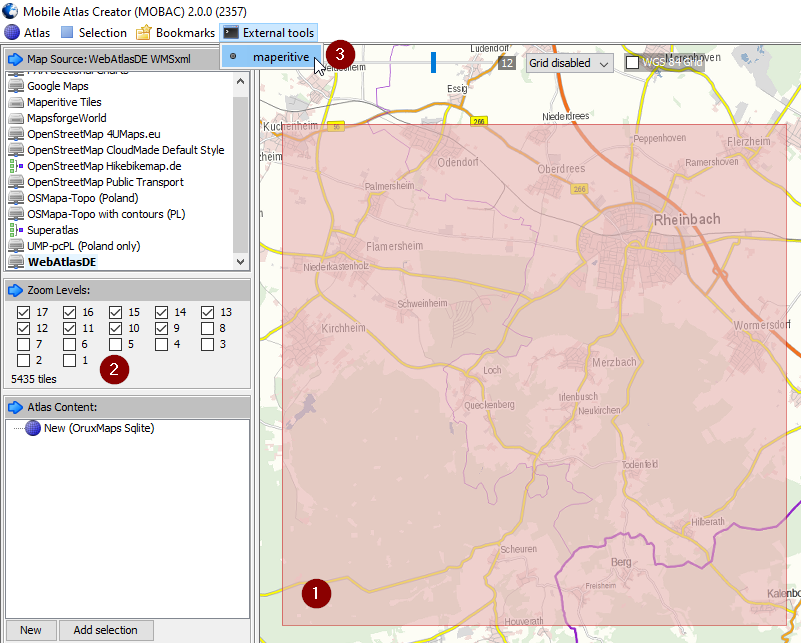
- In MOBAC, mark the region you want to have in the database.
- Select the zoom levels you want to have in the database.
- Click on “External tools” and select “maperitive”.
![MOBAC workflow #1]()
Steps 1-3 in MOBAC - A window will ask you to confirm the start of Maperitive and the parameters that will be handed over. Make sure that minimum and maximum zoom level are as expected.
![MOBAC workflow #2]()
Check zoom levels - Maperative will now start up and automatically walk through the necessary steps to generate the Superatlas tiles. Maperative will close itself as soon as the tiles are done. Depending on zoom levels and mapped area this may take minutes to hours.
- Close and reopen MOBAC. MOBAC may otherwise not realize that new tiles are there. MOBAC usually keeps all settings, including the selected map region etc.
- Select “Superatlas” as map source and continue to create your offline map as usual. If you’ve never done this, have a look at the quick start manual of MOBAC.

In case you already have the Superatlas tiles for the required region, the above steps are not necessary any more; you may directly create the offline files.
Of course any features you use in MOBAC, e.g. multiple map layers etc., work as usual. From the MOBAC point of view the Superatlas is nothing special.
When I create the offline DB for a hiking tour, I usually include not only the Superatlas, but also the 4U maps OSM rendering and the WebAtlasDE unmodified tiles as well. OSM sometimes knows ways that WebAtlasDE does not know, and the unmodified layer allows me to check places where my Superatlas rendering is covering too much. The latter has not happened to me yet, but you never know…
Potential Issues
When Maperative starts up, watch the command window. You’ll see when the OSM download starts. If the selected map region is too large, the Overpass server may reject the query. Maperative will still create tiles, but only with the elevation information. If you realize this too late, hours of waiting may have been in vain.

Limitations
One of the obvious limitations is map size. At some point, OSM download will fail, tile generation will take forever, MOBAC atlas creation will take ages and file sizes will be huge. So be reasonable when creating your offline maps – whole of Germany will certainly bust all limits.
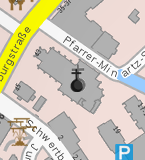
Another limitation is rendering quality in regions where OSM mappers got into very much detail – here’s an example:
Unfortunately Maperitive has no collision algorithm yet. A feature request exists, but as of now you may end up in situations like here.
Not as annoying but still not perfect is the vegetation and landuse rendering – since the ways of the WebAtlasDE are unknown to Maperitive/OSM, they cannot be taken into account when placing the patterns. So, trees will stand on streets, but who cares…
Another thing: While WebAtlasDE does not have many POIs, it has some. Once in a while you’ll find doubled symbols, one from the WebAtlasDE layer, and one from OSM:
Not much to be done about it. I cannot switch off the church symbol as the example above would suggest, because WabAtlasDE does not tag every church. So I’d miss some. Luckily, the symbol placement often is so close you hardly notice it (like in the image above).
Potential Improvements
Currently the OSM data download in Maperitive is rather inefficient, since there is no selection of what is actually downloaded. Espacially with large regions you may hit a wall because of too large queries. It should not be too difficult to make the query more selective. That might also speed up tile creation.
Another thing: It is possible to download a copy of the OSM data locally as a large, compressed file, e.g. from Geofabrik. Maperitive can make use of these data extracts. I never tried it, but this may speed up tile creation and may allow for rather large maps. Would be worth a try.
Other countries
The European Union is following an open data strategy in many places, and the Geo-portals like WebAtlasDE are implementations of this. Many EU countries offer free access to their map data in a similar way, typically asking you to register, but being free of charge for private use. The map quality is usually excellent, although the features provided vary between the countries, e.g. with regard of POIs, hillshading, contours etc. This may require to adjust the Maperative script and/or rules, but I hope the information above is enough to achieve this.
I’ll list all countries below where I successfully created Superatlas-implementations. This is certainly not exhaustive and may grow over time. If a country is missing, look for it yourself, it is not that difficult to figure out the mapsource-files, and sometimes they are even provided by the map vendor! If you created an implementation, I’d be happy to get a mail from you to learn about it. If it’s OK for you, I’ll then publish your solution here.
Important: All services I mention below were free of charge and allowed the usage described here at the time I wrote the regarding section. However, terms of use may change over time. Make sure that the intended purpose is still legal and allowed before following my examples – it is your responsibility to understand the terms of use and adhere to them!
Maperative from MOBAC with no Elevation Information
Since many countries already have contour lines and/or hillshading in their maps, it is a good idea to create a Maperative external tool command to create tiles without elevation information. Approach is the same as above, just three lines stripped from the batch:
<?xml version="1.0" encoding="UTF-8" standalone="yes"?>
<ExternalTool>
    <name>maperitive (no elevation)</name>
    <command>cmd.exe /c start [PATH TO]maperitiveNoElevation.bat</command>
    <parameters>MIN_LON MIN_LAT MAX_LON MAX_LAT MIN_ZOOM MAX_ZOOM MAPSOURCE_NAME MAPSOURCE_DISPLAYNAME NAME_EDITBOX</parameters>
    <debug>true</debug>
</ExternalTool>
Replace [PATH TO] by the path to the batch file.
@echo clear-map > autogen.mscript
@echo use-ruleset location=[PATH TO MAPERITIVE]\Rules\Superatlas.mrules >> autogen.mscript
@echo apply-ruleset >> autogen.mscript
@echo set-setting name=map.rendering.tiles.rendering-bounds-buffer value=256 >> autogen.mscript
@echo set-geo-bounds %1,%2,%3,%4 >> autogen.mscript
@echo download-osm-overpass >> autogen.mscript
@echo generate-tiles minzoom=%5 maxzoom=%6 tilesdir=[PATH TO MAPERITIVE]\Tiles >> autogen.mscript
[PATH TO MAPERITIVE]\maperitive.exe -exitafter [PATH TO MOBAC]\autogen.mscript
exit
Replace [PATH TO MAPERITIVE] by the Maperitive directory (3×), and [PATH TO MOBAC] by the MOBAC directory (1×).
Austria
For Austria there exist several map sources. basemap.at is free even without registration, and provides MOBAC mapsources on it’s homepage! Cool!
“Basemap Grau” has hillshading and contour lines, so for Superatlas create the Maperitive tiles without elevation information. “Basemap Grau” also has a low key color scheme which I like, so that’s what I use for my Austria Superatlas (make sure you installed the mapsources from basemap.at beforehand):
<?xml version="1.0" encoding="UTF-8" standalone="yes"?>
<customMultiLayerMapSource>
   <name>Superatlas Austria</name>
   <tileType>png</tileType>
   <backgroundColor>#000000</backgroundColor>
   <layersAlpha>1.0 0.8</layersAlpha>
   <layers>
		<mapSource>
			<name>Basemap Grau</name>
		</mapSource>
		<localTileFiles>
			<name>Maperitive Tiles</name>
			<sourceFolder>[PATH TO MAPERITIVE]\Tiles</sourceFolder>
			<backgroundColor>#00000000</backgroundColor>
		</localTileFiles>
	</layers>
</customMultiLayerMapSource>
As many times before, replace [PATH TO MAPERITIVE] to match your installation.
There’s also austrianmap.at from the Bundesamt für Eich- und Vermessungswesen, which provides very good maps (actually again scanned topographic maps), but as of now I’ve not found a legal way to use them.
Belgium
The Nationaal Geografisch Instituut (NGI) offers very good topographic maps (look computer rendered to me). You need to register here: NGI registration form (Durch; also available in French). Usage for private purposes is free as far as I understand the terms of use.
After that, you’ll receive an email conatining a link to an XML containing the capabilities of their WMTS. In there, you’ll find a line that looks like this:
<ResourceURL resourceType="tile" template="http://[BASE URL]/1.0.0/topo/{style}/{TileMatrixSet}/{TileMatrix}/{TileRow}/{TileCol}.png" format="image/png"/>You’ll need [BASE URL] for the mapsource:
<customMapSource>
	<name>Belgium Topo</name>
	<minZoom>7</minZoom>
	<maxZoom>17</maxZoom>
	<tileType>png</tileType>
	<tileUpdate>None</tileUpdate>
	<url>http://[BASE URL]/1.0.0/topo/default/3857/{$z}/{$y}/{$x}.png</url>
	<backgroundColor>#000000</backgroundColor>
</customMapSource>
For Superatlas the mapsource is rather simple, just pick up the name of the mapsource above – a scheme that will repeat itself for most mapsources to follow:
<customMultiLayerMapSource>
	<name>Superatlas Belgium</name>
	<tileType>PNG</tileType>
    <backgroundColor>#000000</backgroundColor>
    <layersAlpha>1.0 0.8</layersAlpha>
	<layers>
		<mapSource>
			<name>Belgium Topo</name>
		</mapSource>
		<localTileFiles>
			<name>Maperitive Tiles</name>
			<sourceFolder>[PATH TO MAPERTIVE]\Tiles</sourceFolder>
			<backgroundColor>#00000000</backgroundColor>
		</localTileFiles>
	</layers>
</customMultiLayerMapSource>
Replace [PATH TO MAPERITIVE] to match your installation.
The maps from NGI already contain contour lines and at some zoom levels hillshading, so use the “no elevation” Maperitive. NGI maps also contain some POIs and some lanscape features which somtimes interact not too well with the Superatlas layer. It may make sense to create different rendering rules for Belgium.
Denmark
Googeling brought me to geus.dk first, but their terms of use, while granting free access, strongly discourage the use of tiled download from their WMS. Asking them, Bjarni from IT very friendly pointed me at kortforsyningen.dk, which offers a large amount of data for download (even Minecraft data!) – thanks for this hint! Most is available via WMS, but some also via WMTS. You need to register, all in Danish, but Google-translatable  – after registration you’ll need to set a password, and with these credentials access to the data is free and download is allowed.
With regard to topographic maps, you need to choose between vector and raster maps, the latter being feature rich and include contour lines, the former computer rendered, more simplistic/abstract and having no elevation information. The vector maps are very good for the Superatlas overlay, while the raster offer loads of additional information. Difficult choice – so I decided to create two map sources:
- A Bean shell script mapsource that has the 1:1,000,000, 1:500,000, 1:200,000, 1:100,000, 1:50,000 and 1:25,000 raster maps as zoom layers 8, 11, 12, 13, 14 and 15, and filling all other zoom levels from 7 to 20 with the vector maps, and
- A simpler XML mapsource just having the vector map for all zoom levels.
Bean shell allows you to create rather complex map sources that require coordinate transformations, some web request modifications and much more, but I am no expert here. The examples from the MOBAC wiki are a good starting point if you’d like to learn more.
Let’s start with the simple XML source:
<?xml version="1.0" encoding="UTF-8" standalone="yes"?>
<customWmsMapSource>
   <name>Denmark Vector</name>
   <minZoom>7</minZoom>
   <maxZoom>20</maxZoom>
   <tileType>JPG</tileType>
   <version>1.1.1</version>
   <layers>dtk_skaermkort</layers>
   <url>https://services.kortforsyningen.dk/service?</url>
   <coordinatesystem>EPSG:4326</coordinatesystem>
   <aditionalparameters><![CDATA[&SERVICENAME=topo_skaermkort&jpegquality=80&styles=&exceptions=application/vnd.ogc.se_inimage&STYLES=&login=[USERNAME]&password=[PASSWORD]]]></aditionalparameters>
   <backgroundColor>#000000</backgroundColor>
</customWmsMapSource>
Please watch for line 11 – you’ll need to fill in your credetials for [USERNAME] and [PASSWORD].
The Bean shell mapsource is based on the second example on this MOBAC wiki page. The layer logic is slightly more complicated due to the mixing of the various maps – make sure to replace [USERNAME] and [PASSWORD] with your credentials in all lines (7×):
/**
beanshell code to use the online maps from https://services.kortforsyningen.dk in "Mobile Atlas Creator"
(http://mobac.sourceforge.net/)
Based on this example: http://mobac.sourceforge.net/wiki/index.php/BeanShellMapSources

put it into your "mapsources"-directory...

    This program is free software: you can redistribute it and/or modify
    it under the terms of the GNU General Public License as published by
    the Free Software Foundation, either version 3 of the License, or
    (at your option) any later version.

    This program is distributed in the hope that it will be useful,
    but WITHOUT ANY WARRANTY; without even the implied warranty of
    MERCHANTABILITY or FITNESS FOR A PARTICULAR PURPOSE.  See the
    GNU General Public License for more details.

    You should have received a copy of the GNU General Public License
    along with this program.  If not, see <http://www.gnu.org/licenses/>
**/

static import java.lang.Math.*;

name = "Denmark TopoMix";

tileType = "png";

tileSize = 256; // optional
minZoom = 7;   // optional
maxZoom = 20;   // optional

/**
This method is called for each tile:
input parameters for this script: "zoom", "x" and "y"
**/
String getTileUrl( int zoom, int x, int y ) {

	if (zoom == 8) {
		return ("https://services.kortforsyningen.dk/topo_basis?TRANSPARENT=TRUE&FORMAT=image/png&service=WMS&version=1.1.1&request=GetMap&srs=EPSG:3857&bbox=" + mercatorTileEdges(x,y,zoom) + "&width=256&height=256&LAYERS=dtk_oversigt&styles=default&login=[USERNAME]&password=[PASSWORD]");
	} else if (zoom == 11) {
		return ("https://services.kortforsyningen.dk/topo_basis?TRANSPARENT=TRUE&FORMAT=image/png&service=WMS&version=1.1.1&request=GetMap&srs=EPSG:3857&bbox=" + mercatorTileEdges(x,y,zoom) + "&width=256&height=256&LAYERS=dtk_d500&styles=default&login=[USERNAME]&password=[PASSWORD]");
	} else if (zoom == 12) {
		return ("https://services.kortforsyningen.dk/topo_basis?TRANSPARENT=TRUE&FORMAT=image/png&service=WMS&version=1.1.1&request=GetMap&srs=EPSG:3857&bbox=" + mercatorTileEdges(x,y,zoom) + "&width=256&height=256&LAYERS=dtk_d200&styles=default&login=[USERNAME]&password=[PASSWORD]");
	} else if (zoom == 13) {
		return ("https://services.kortforsyningen.dk/topo100?TRANSPARENT=TRUE&FORMAT=image/png&service=WMS&version=1.1.1&request=GetMap&srs=EPSG:3857&bbox=" + mercatorTileEdges(x,y,zoom) + "&width=256&height=256&LAYERS=dtk_1cm&styles=default&login=[USERNAME]&password=[PASSWORD]");
	} else if (zoom == 14) {
		return ("https://services.kortforsyningen.dk/topo50?TRANSPARENT=TRUE&FORMAT=image/png&service=WMS&version=1.1.1&request=GetMap&srs=EPSG:3857&bbox=" + mercatorTileEdges(x,y,zoom) + "&width=256&height=256&LAYERS=dtk_2cm&styles=default&login=[USERNAME]&password=[PASSWORD]");
	} else if (zoom == 15) {
		return ("https://services.kortforsyningen.dk/topo25?TRANSPARENT=TRUE&FORMAT=image/png&service=WMS&version=1.1.1&request=GetMap&srs=EPSG:3857&bbox=" + mercatorTileEdges(x,y,zoom) + "&width=256&height=256&LAYERS=topo25_klassisk&styles=default&login=[USERNAME]&password=[PASSWORD]");
	} else {
		return ("https://services.kortforsyningen.dk/service?SERVICENAME=topo_skaermkort&service=WMS&version=1.1.1&request=GetMap&srs=EPSG:3857&bbox=" + mercatorTileEdges(x,y,zoom) + "&width=256&height=256&LAYERS=dtk_skaermkort&styles=&format=image/jpeg&jpegquality=80&styles=&exceptions=application/vnd.ogc.se_inimage&login=[USERNAME]&password=[PASSWORD]");
	}
}

void addHeaders( java.net.HttpURLConnection conn) {
}

numTiles(z){
    return abs(pow(2,z));
}

mercatorToLat(mercatorY){
  return(toDegrees(atan(sinh(mercatorY))));
}

latEdges1(y,z){
  n = numTiles(z);
  unit = 1 / n;
  relY1 = y * unit;
  lat1 = mercatorToLat(PI * (1 - 2 * relY1));
  return lat1;
}

latEdges2(y,z){
  n = numTiles(z);
  unit = 1 / n;
  relY1 = y * unit;
  relY2 = relY1 + unit;
  lat2 = mercatorToLat(PI * (1 - 2 * relY2));
  return lat2;
}

lonEdges1(x,z){
  n = numTiles(z);
  unit = 360 / n;
  lon1 = -180 + x * unit;
  return lon1;
}

lonEdges2(x,z){
  n = numTiles(z);
  unit = 360 / n;
  lon1 = -180 + x * unit;
  lon2 = lon1 + unit;
  return lon2;
}

tileEdges(x,y,z){
  return (latEdges2(y,z) + "," +
   	  lonEdges1(x,z) + "," +
	  latEdges1(y,z) + "," +
	  lonEdges2(x,z));
}

lon2mercator(l){
  return (l * 20037508.34 / 180);
}

lat2mercator(l){
 r = toRadians(l);
 lat = log((1+sin(r)) / (1-sin(r)));
 return (lat * 20037508.34 / 2 / PI);
}

mercatorTileEdges(x,y,z){
  return (lon2mercator(lonEdges1(x,z)) + "," +
          lat2mercator(latEdges2(y,z)) + "," +
	  lon2mercator(lonEdges2(x,z)) + "," +
	  lat2mercator(latEdges1(y,z)));
}
The Superatlas mapsource follows the Germany-scheme, since the vector maps are a WMS XML map source:
<customMultiLayerMapSource>
	<name>Superatlas DK</name>
	<tileType>png</tileType>
	<backgroundColor>#000000</backgroundColor>
	<layersAlpha>1.0 0.8</layersAlpha>
	<layers>
		<customWmsMapSource>
		   <name>Dänemark TopoNew</name>
		   <minZoom>7</minZoom>
		   <maxZoom>20</maxZoom>
		   <tileType>JPG</tileType>
		   <version>1.1.1</version>
		   <layers>dtk_skaermkort</layers>
		   <url>https://services.kortforsyningen.dk/service?</url>
		   <coordinatesystem>EPSG:4326</coordinatesystem>
		   <aditionalparameters><![CDATA[&SERVICENAME=topo_skaermkort&jpegquality=80&styles=&exceptions=application/vnd.ogc.se_inimage&STYLES=&login=[USERNAME]&password=[PASSWORD]]]></aditionalparameters>
		   <backgroundColor>#000000</backgroundColor>
		</customWmsMapSource>
		<localTileFiles>
			<name>Maperitive Tiles</name>
			<sourceFolder>[PATH TO MAPERITIVE]\Tiles</sourceFolder>
			<backgroundColor>#00000000</backgroundColor>
		</localTileFiles>
	</layers>
</customMultiLayerMapSource>
Replace [PATH TO MAPERITIVE], [USERNAME] and [PASSWORD] to match your data.
France
The Institut national de l’information géographique et forestière (IGN) offers excellent official maps via its Geoportail. You’ll need to register to legally access and use the excellent IGN maps. Honestly, I do not exactly remember how I did the registration a few years ago, but I think it was here. After registration, you will also get an access code that we’ll need for the Bean shell mapsource IGNgeoportail.bsh:
name = "IGN Geoportail";

tileType = "png";
tileSize = 256;
minZoom = 0;
maxZoom = 18;
tileUpdate = TileUpdate.IfModifiedSince;
backgroundColor = "#ffffff";
ignoreError = "True";

String getTileUrl( int zoom, int x, int y ) {
    return "http://wxs.ign.fr/[INSERT YOUR ACCESS ID HERE]/wmts?SERVICE=WMTS&VERSION=1.0.0&REQUEST=GetTile&LAYER=GEOGRAPHICALGRIDSYSTEMS.MAPS&STYLE=normal&FORMAT=image/jpeg&TILEMATRIXSET=PM&TILEMATRIX=" + zoom + "&TILEROW=" + y + "&TILECOL=" + x + ".png";
}
Replace [INSERT YOUR ACCESS ID HERE] by your access code from above.
The very observant person may notice that I ask for FORMAT=image/jpeg, but in the end use extension .png – that’s OK. I tried it differently, but did not work…
The XML for the Superatlas follows the simple name reference scheme:
<customMultiLayerMapSource>
	<name>Superatlas France</name>
	<tileType>PNG</tileType>
	<backgroundColor>#000000</backgroundColor>
	<layersAlpha>1.0 0.8</layersAlpha>
	<layers>
		<mapSource>
			<name>IGN Geoportail</name>
		</mapSource>
		<localTileFiles>
			<name>Maperitive Tiles</name>
			<sourceFolder>[PATH TO MAPERITIVE]\Tiles</sourceFolder>
			<backgroundColor>#00000000</backgroundColor>
		</localTileFiles>
	</layers>
</customMultiLayerMapSource>
Replace [PATH TO MAPERITIVE] to match your installation.
Since the IGN maps already have contour lines and hillshading, I’d recommend to use non-elevation Superatlas tiles. Additionally the icon sizes in the Superatlas rendering are too small for the IGN map resolution, so I’d also recommend to create dedicated rendering rules. However, the IGN maps are already so good (it’s actually scanned topographic maps) that the Superatlas OSM-layer is not really needed – I never bothered to adjust my own rendering.
Luxembourg
The official map service can be found at the Geoportail Luxembourg, which is available in four languages. And they offer a tremendous amount of different layers and information, among them very good topographic maps. The terms of use allow to use this maps for free; however, to use the API for MOBAC you need to register. There is no webform, just write an email to support.geoportail@act.etat.lu and state your request (English worked fine for me). I asked them for a specific URL as referer in my mail and they registered this URL for access. So, the mapsource looks like this – it adds the referer as a header variable for authentication:
name = "Luxembourg Topo";

tileType = "png";
tileSize = 256;
minZoom = 10;
maxZoom = 17;
tileUpdate = TileUpdate.IfModifiedSince;
backgroundColor = "#ffffff";
ignoreError = "True";

String getTileUrl( int zoom, int x, int y ) {
	LoadBalancer = (x % 2) + 3;
	return "https://wmts" + LoadBalancer + ".geoportail.lu/mapproxy_4_v3/wmts/topogr_global/GLOBAL_WEBMERCATOR_4_V3/" + zoom + "/" + x + "/" + y + ".png";
}

void addHeaders( java.net.HttpURLConnection conn) {
	conn.addRequestProperty("Referer","http://[REFERING URL]");
}
Replace [REFERING URL] with the URL they registered for you.
Tiny addendum: Since MOBAC beanshell does not support the serverParts load balancing as in XML map sources, I programmed a simplistic load balancing using modulo 2 of the x tile number as server part.
You may also try to replace topogr_global with basemap_2015_global – it’s another rendering of the topographic maps, which you may or may not like more than the other. Both contain some elevation information (contours and/or hillshading), so use the “no eleveation” Maperitive tiles.
For Superatlas again the simple name scheme:
<customMultiLayerMapSource>
	<name>Superatlas Luxembourg</name>
	<tileType>PNG</tileType>
    <backgroundColor>#000000</backgroundColor>
    <layersAlpha>1.0 0.8</layersAlpha>
	<layers>
		<mapSource>
			<name>Luxembourg Topo</name>
		</mapSource>
		<localTileFiles>
			<name>Maperitive Tiles</name>
			<sourceFolder>[PATH TO MAPERTIVE]\Tiles</sourceFolder>
			<backgroundColor>#00000000</backgroundColor>
		</localTileFiles>
	</layers>
</customMultiLayerMapSource>
Replace [PATH TO MAPERITIVE] to match your installation.
The Netherlands
The Netherlands offer their maps under CC-BY-SA 3.0 licensing if it is listed “open”. Their service itself is offered under fair-use policy (see also here) without any registration. Similar to Denmark, they offer raster and vector based maps, so like Denmark I put two mapsources here. However, there are even two kind of vector renderings, the topo10 mimicking the raster map style. So I used the topo10 to fill up the missing layers in the raster maps, while the vector-only mapsource uses the BRT achtergrondkaart. The achtergrondkaart is well suited for the Superatlas layer. The raster maps have different resolutions as compared to Denmark, so the same scales have different zoom levels here.
The pure vector-based mapsource (no needs for adjustments this time):
name = "Netherlands Vector";

tileType = "png";
tileSize = 256;
minZoom = 6;
maxZoom = 19;
tileUpdate = TileUpdate.IfModifiedSince;
backgroundColor = "#ffffff";
ignoreError = "True";

String getTileUrl( int zoom, int x, int y ) {
	return "http://geodata.nationaalgeoregister.nl/tiles/service/wmts/?SERVICE=WMTS&REQUEST=GetTile&VERSION=1.0.0&LAYER=brtachtergrondkaart&TILEMATRIXSET=EPSG:3857&TILEMATRIX=EPSG:3857:" + zoom + "&TILEROW=" + y + "&TILECOL=" + x + "&FORMAT=image/png8";
}
And the raster maps (nothing to edit here also), based on the Wiki-example:
/**
beanshell code to use the online maps from http://geodata.nationaalgeoregister.nl in "Mobile Atlas Creator"
(http://mobac.sourceforge.net/)
Based on this example: http://mobac.sourceforge.net/wiki/index.php/BeanShellMapSources

put it into your "mapsources"-directory...

    This program is free software: you can redistribute it and/or modify
    it under the terms of the GNU General Public License as published by
    the Free Software Foundation, either version 3 of the License, or
    (at your option) any later version.

    This program is distributed in the hope that it will be useful,
    but WITHOUT ANY WARRANTY; without even the implied warranty of
    MERCHANTABILITY or FITNESS FOR A PARTICULAR PURPOSE.  See the
    GNU General Public License for more details.

    You should have received a copy of the GNU General Public License
    along with this program.  If not, see <http://www.gnu.org/licenses/>
**/

static import java.lang.Math.*;

name = "Netherlands Raster";

tileType = "png";

tileSize = 256; // optional
minZoom = 8;   // optional
maxZoom = 22;   // optional

/**
This method is called for each tile:
input parameters for this script: "zoom", "x" and "y"
**/
String getTileUrl( int zoom, int x, int y ) {
	if (zoom > 16) {
		return ("http://geodata.nationaalgeoregister.nl/top10nlv2/wms?LAYERS=top10nlv2&FORMAT=image/png&TRANSPARENT=TRUE&SERVICE=WMS&VERSION=1.1.1&REQUEST=GetMap&STYLES=&SRS=EPSG:3857&BBOX=" + mercatorTileEdges(x,y,zoom) + "&width=256&height=256");
	} else if (zoom == 16) {
		return ("http://geodata.nationaalgeoregister.nl/top25raster/wms?LAYERS=top25raster&FORMAT=image/png&TRANSPARENT=TRUE&SERVICE=WMS&VERSION=1.1.1&REQUEST=GetMap&STYLES=&SRS=EPSG:3857&BBOX=" + mercatorTileEdges(x,y,zoom) + "&width=256&height=256");
	} else if (zoom == 15) {
		return ("http://geodata.nationaalgeoregister.nl/top50raster/wms?LAYERS=top50raster&FORMAT=image/png&TRANSPARENT=TRUE&SERVICE=WMS&VERSION=1.1.1&REQUEST=GetMap&STYLES=&SRS=EPSG:3857&BBOX=" + mercatorTileEdges(x,y,zoom) + "&width=256&height=256");
	} else if (zoom == 14) {
		return ("http://geodata.nationaalgeoregister.nl/top100raster/wms?LAYERS=top100raster&FORMAT=image/png&TRANSPARENT=TRUE&SERVICE=WMS&VERSION=1.1.1&REQUEST=GetMap&STYLES=&SRS=EPSG:3857&BBOX=" + mercatorTileEdges(x,y,zoom) + "&width=256&height=256");
	} else if (zoom == 13) {
		return ("http://geodata.nationaalgeoregister.nl/top250raster/wms?LAYERS=top250raster&FORMAT=image/png&TRANSPARENT=TRUE&SERVICE=WMS&VERSION=1.1.1&REQUEST=GetMap&STYLES=&SRS=EPSG:3857&BBOX=" + mercatorTileEdges(x,y,zoom) + "&width=256&height=256");
	} else if (zoom == 12) {
		return ("http://geodata.nationaalgeoregister.nl/top500raster/wms?LAYERS=top500raster&FORMAT=image/png&TRANSPARENT=TRUE&SERVICE=WMS&VERSION=1.1.1&REQUEST=GetMap&STYLES=&SRS=EPSG:3857&BBOX=" + mercatorTileEdges(x,y,zoom) + "&width=256&height=256");
	} else {
		return ("http://geodata.nationaalgeoregister.nl/top1000raster/wms?LAYERS=top1000raster&FORMAT=image/png&TRANSPARENT=TRUE&SERVICE=WMS&VERSION=1.1.1&REQUEST=GetMap&STYLES=&SRS=EPSG:3857&BBOX=" + mercatorTileEdges(x,y,zoom) + "&width=256&height=256");
	}
}

void addHeaders( java.net.HttpURLConnection conn) {
}

numTiles(z){
    return abs(pow(2,z));
}

mercatorToLat(mercatorY){
  return(toDegrees(atan(sinh(mercatorY))));
}

latEdges1(y,z){
  n = numTiles(z);
  unit = 1 / n;
  relY1 = y * unit;
  lat1 = mercatorToLat(PI * (1 - 2 * relY1));
  return lat1;
}

latEdges2(y,z){
  n = numTiles(z);
  unit = 1 / n;
  relY1 = y * unit;
  relY2 = relY1 + unit;
  lat2 = mercatorToLat(PI * (1 - 2 * relY2));
  return lat2;
}

lonEdges1(x,z){
  n = numTiles(z);
  unit = 360 / n;
  lon1 = -180 + x * unit;
  return lon1;
}

lonEdges2(x,z){
  n = numTiles(z);
  unit = 360 / n;
  lon1 = -180 + x * unit;
  lon2 = lon1 + unit;
  return lon2;
}

tileEdges(x,y,z){
  return (latEdges2(y,z) + "," +
   	  lonEdges1(x,z) + "," +
	  latEdges1(y,z) + "," +
	  lonEdges2(x,z));
}

lon2mercator(l){
  return (l * 20037508.34 / 180);
}

lat2mercator(l){
 r = toRadians(l);
 lat = log((1+sin(r)) / (1-sin(r)));
 return (lat * 20037508.34 / 2 / PI);
}

mercatorTileEdges(x,y,z){
  return (lon2mercator(lonEdges1(x,z)) + "," +
          lat2mercator(latEdges2(y,z)) + "," +
	  lon2mercator(lonEdges2(x,z)) + "," +
	  lat2mercator(latEdges1(y,z)));
}
And finally the Superatlas (no surprises here):
<customMultiLayerMapSource>
	<name>Superatlas NL</name>
	<tileType>PNG</tileType>
    <backgroundColor>#000000</backgroundColor>
    <layersAlpha>1.0 0.8</layersAlpha>
	<layers>
		<mapSource>
			<name>Netherlands Vector</name>
		</mapSource>
		<localTileFiles>
			<name>Maperitive Tiles</name>
			<sourceFolder>[PATH TO MAPERITIVE]\Tiles</sourceFolder>
			<backgroundColor>#00000000</backgroundColor>
		</localTileFiles>
	</layers>
</customMultiLayerMapSource>
Replace [PATH TO MAPERITIVE] to match your installation.
Switzerland
Swisstopo offers topographic maps of very good quality; you may not need to add the Superatlas layer. You can “buy” a free 5 gigapixel/year subscription for their WMS here. 5 gigapixel is roughly 76,000 tiles of 256×256 pixels – should be enough for quite a few hiking tours. Actually 76,000 tiles is about one fifth of whole Switzerland at zoom level 16! There is also a free 25 gigapixel WMTS subscription, but the WMTS uses zoom levels and projections not compatible with MOBAC.
After registration for the WMS, you’ll get an auto-generated username and password. These need to be base64 encoded to be added as Authorization header into the web request. I’ve no idea if and how Bean shell/Java could do base64 encoding of these credentials inline, so I used a base64-encoder to generate the header once and hard-coded it into the Bean shell mapsource. If you’d like to follow this approach, put the string username:password matching your credentials into your favourite encoder and get back the base64 encoded string, which for the given example would be dXNlcm5hbWU6cGFzc3dvcmQ=.
The mapsource is again the Bean shell example from the MOBAC wiki modified for our needs – please make sure to put your base64 encoded username/password into line 46:
/**
beanshell code to use the online maps from SwissTopo
(https://www.swisstopo.admin.ch) in "Mobile Atlas Creator"
(http://mobac.sourceforge.net/)
Based on this example: http://mobac.sourceforge.net/wiki/index.php/BeanShellMapSources

put it into your "mapsources"-directory...

    This program is free software: you can redistribute it and/or modify
    it under the terms of the GNU General Public License as published by
    the Free Software Foundation, either version 3 of the License, or
    (at your option) any later version.

    This program is distributed in the hope that it will be useful,
    but WITHOUT ANY WARRANTY; without even the implied warranty of
    MERCHANTABILITY or FITNESS FOR A PARTICULAR PURPOSE.  See the
    GNU General Public License for more details.

    You should have received a copy of the GNU General Public License
    along with this program.  If not, see <http://www.gnu.org/licenses/>

**/


static import java.lang.Math.*;

name = "Switzerland Topo";

tileType = "png";

tileSize = 256; // optional
minZoom = 8;   // optional
maxZoom = 16;   // optional

/**
This method is called for each tile:
input parameters for this script: "zoom", "x" and "y"
**/
String getTileUrl( int zoom, int x, int y ) {

	return ("https://wms.swisstopo.admin.ch/?LAYERS=ch.swisstopo.pixelkarte-farbe&TRANSPARENT=true&FORMAT=image/png&SERVICE=WMS&VERSION=1.1.1&REQUEST=GetMap&STYLES=&EXCEPTIONS=application/vnd.ogc.se_inimage&SRS=EPSG:3857&BBOX=" + mercatorTileEdges(x,y,zoom) + "&WIDTH=256&HEIGHT=256");

}

void addHeaders( java.net.HttpURLConnection conn) {
	conn.addRequestProperty("Authorization","Basic dXNlcm5hbWU6cGFzc3dvcmQ=");
}


numTiles(z){
    return abs(pow(2,z));
}

mercatorToLat(mercatorY){
  return(toDegrees(atan(sinh(mercatorY))));
}

latEdges1(y,z){
  n = numTiles(z);
  unit = 1 / n;
  relY1 = y * unit;
  lat1 = mercatorToLat(PI * (1 - 2 * relY1));
  return lat1;
}

latEdges2(y,z){
  n = numTiles(z);
  unit = 1 / n;
  relY1 = y * unit;
  relY2 = relY1 + unit;
  lat2 = mercatorToLat(PI * (1 - 2 * relY2));
  return lat2;
}

lonEdges1(x,z){
  n = numTiles(z);
  unit = 360 / n;
  lon1 = -180 + x * unit;
  return lon1;
}

lonEdges2(x,z){
  n = numTiles(z);
  unit = 360 / n;
  lon1 = -180 + x * unit;
  lon2 = lon1 + unit;
  return lon2;
}

tileEdges(x,y,z){
  return (latEdges2(y,z) + "," +
   	  lonEdges1(x,z) + "," +
	  latEdges1(y,z) + "," +
	  lonEdges2(x,z));
}

lon2mercator(l){
  return (l * 20037508.34 / 180);
}

lat2mercator(l){
 r = toRadians(l);
 lat = log((1+sin(r)) / (1-sin(r)));
 return (lat * 20037508.34 / 2 / PI);
}

mercatorTileEdges(x,y,z){
  return (lon2mercator(lonEdges1(x,z)) + "," +
          lat2mercator(latEdges2(y,z)) + "," +
	  lon2mercator(lonEdges2(x,z)) + "," +
	  lat2mercator(latEdges1(y,z)));
}
You may want to look at the capabilities of the WMS – they offer quite a bit of layers there, among those ch.swisstopo.swisstlm3d-karte-farbe, which is an automatically rendered high resolution topographic map. The capabilites can be found here (requires authentication with your credentials).
If you want to use the Superatlas layer (which might still be useful since the POIs in the Swiss rendering are very low key), here the standard scheme – use the layer without elevation data.
<customMultiLayerMapSource>
	<name>Superatlas CH</name>
	<tileType>PNG</tileType>
    <backgroundColor>#000000</backgroundColor>
    <layersAlpha>1.0 0.8</layersAlpha>
	<layers>
		<mapSource>
			<name>Switzerland Topo</name>
		</mapSource>
		<localTileFiles>
			<name>Maperitive Tiles</name>
			<sourceFolder>[PATH TO MAPERITIVE]\Tiles</sourceFolder>
			<backgroundColor>#00000000</backgroundColor>
		</localTileFiles>
	</layers>
</customMultiLayerMapSource>
Countries that will not work
UK
Ordnance survey allows to register for free for their API that provides their famous maps, but terms of use explicitly deny storing maps on any device except for 24 hours max. of caching 
To be continued…
I’ll add countries here whenever I’ve figured out a new one.
OruxMaps Mapsources
As I mentioned above, I really like and can recommend OruxMaps as GPS hiking app for Android! I recently learned that I can add custom mapsources also to OruxMaps to use as online maps and even to create offline maps out of OruxMaps directly. The format is so close to MOBAC mapsources, it’s practically a no-brainer to translate them. basemap.at even provides the code for the Austrian maps on their webpage. Here you’ll find the mapsources for all countries I figured out for MOBAC as far as they work with OruxMaps. N.b.: It’s only the “native” maps, no Superatlas.
Important: It is your responsibility to understand the terms of use of each service in the mapsources and adhere to them! Abuse will most likely at some point cause the services to close down for OruxMaps or to charge fees.
The files below go into the oruxmaps/mapfiles directory on your phone, and it seems it must be the internal storage (maybe wrong, I’ve seen phones behave differently with regard to storage locations). web_services.xml replaces the one that’s already there, and onlinemapsources.xml goes into the customonlinemaps subdirectory (do not replace the one in the mapfiles directory itself!).
Do not just copy the files from here – you’ll need to edit them and add the access codes, referers, keys etc. as described above for the MOBAC mapsources – the regarding lines are highlighted below. Which means that for several of the services you need to register. The regarding tokens are exactly the same as for MOBAC. You may also decide to strip the mapsources that require registration/authentication – should be easy to figure out.
I’ll keep these two files updated in case I create new MOBAC sources that can also be used in OruxMaps.
<?xml version="1.0" encoding="utf-8"?>
<onlinemapsources>

	<onlinemapsource uid="6001">
		<name>basemap.at (AT)</name>
		<url><![CDATA[http://{$s}.wien.gv.at/basemap/geolandbasemap/normal/google3857/{$z}/{$y}/{$x}.png]]></url>
		<website><![CDATA[<a href="http://www.basemap.at/">basemap.at</a>]]></website>
		<minzoom>0</minzoom>
		<maxzoom>19</maxzoom>
		<projection>MERCATORESFERICA</projection>
		<servers>maps,maps1,maps2,maps3,maps4</servers>
		<httpparam name="User-Agent">{om}</httpparam>
		<cacheable>1</cacheable>
		<downloadable>1</downloadable>
		<maxtilesday>0</maxtilesday>
		<maxthreads>0</maxthreads>
		<xop></xop>
		<yop></yop>
		<zop></zop>
		<qop></qop>
		<sop></sop>
	</onlinemapsource>
	<onlinemapsource uid="6002">
		<name>Belgium Topographic (BE)</name>
		<url><![CDATA[http://www.ngi.be/cartoweb/1.0.0/topo/default/3857/{$z}/{$y}/{$x}.png]]></url>
		<website><![CDATA[<a href="http://www.ngi.be/">ngi.be</a>]]></website>
		<minzoom>7</minzoom>
		<maxzoom>17</maxzoom>
		<projection>MERCATORESFERICA</projection>
		<servers></servers>
		<httpparam name="User-Agent">{om}</httpparam>
		<cacheable>1</cacheable>
		<downloadable>1</downloadable>
		<maxtilesday>0</maxtilesday>
		<maxthreads>0</maxthreads>
		<xop></xop>
		<yop></yop>
		<zop></zop>
		<qop></qop>
		<sop></sop>
	</onlinemapsource>
	<onlinemapsource uid="6003">
		<name>Luxembourg Topographic (LU)</name>
		<url><![CDATA[https://{$s}.geoportail.lu/mapproxy_4_v3/wmts/topogr_global/GLOBAL_WEBMERCATOR_4_V3/{$z}/{$x}/{$y}.png]]></url>
		<website><![CDATA[<a href="http://www.geoportail.lu/">geoportail.lu</a>]]></website>
		<minzoom>10</minzoom>
		<maxzoom>17</maxzoom>
		<projection>MERCATORESFERICA</projection>
		<servers>wmts3,wmts4</servers>
		<httpparam name="User-Agent">{om}</httpparam>
		<httpparam name="Referer">[REFERING URL]</httpparam>
		<cacheable>1</cacheable>
		<downloadable>1</downloadable>
		<maxtilesday>0</maxtilesday>
		<maxthreads>0</maxthreads>
		<xop></xop>
		<yop></yop>
		<zop></zop>
		<qop></qop>
		<sop></sop>
	</onlinemapsource>
	<onlinemapsource uid="6004">
		<name>France Topographic (FR)</name>
		<url><![CDATA[http://wxs.ign.fr/[INSERT YOUR ACCESS ID HERE]/wmts?SERVICE=WMTS&VERSION=1.0.0&REQUEST=GetTile&LAYER=GEOGRAPHICALGRIDSYSTEMS.MAPS&STYLE=normal&FORMAT=image/jpeg&TILEMATRIXSET=PM&TILEMATRIX={$z}&TILEROW={$y}&TILECOL={$x}.png]]></url>
		<website><![CDATA[<a href="http://www.ign.fr/">ign.fr</a>]]></website>
		<minzoom>0</minzoom>
		<maxzoom>18</maxzoom>
		<projection>MERCATORESFERICA</projection>
		<servers></servers>
		<httpparam name="User-Agent">{om}</httpparam>
		<cacheable>1</cacheable>
		<downloadable>1</downloadable>
		<maxtilesday>0</maxtilesday>
		<maxthreads>0</maxthreads>
		<xop></xop>
		<yop></yop>
		<zop></zop>
		<qop></qop>
		<sop></sop>
	</onlinemapsource>
	<onlinemapsource uid="6005">
		<name>Netherlands Basemap (NL)</name>
		<url><![CDATA[http://geodata.nationaalgeoregister.nl/tiles/service/wmts/?SERVICE=WMTS&REQUEST=GetTile&VERSION=1.0.0&LAYER=brtachtergrondkaart&TILEMATRIXSET=EPSG:3857&TILEMATRIX=EPSG:3857:{$z}&TILEROW={$y}&TILECOL={$x}&FORMAT=image/png8]]></url>
		<website><![CDATA[<a href="http://geodata.nationaalgeoregister.nl/">geodata.nationaalgeoregister.nl CC-BY-SA 3.0</a>]]></website>
		<minzoom>6</minzoom>
		<maxzoom>19</maxzoom>
		<projection>MERCATORESFERICA</projection>
		<servers></servers>
		<httpparam name="User-Agent">{om}</httpparam>
		<cacheable>1</cacheable>
		<downloadable>1</downloadable>
		<maxtilesday>0</maxtilesday>
		<maxthreads>0</maxthreads>
		<xop></xop>
		<yop></yop>
		<zop></zop>
		<qop></qop>
		<sop></sop>
	</onlinemapsource>

</onlinemapsources>
<?xml version="1.0" encoding="UTF-8"?> <wms_services> <wms> <name>Germany WebAtlasDE</name> <uid>6600</uid><!--unique identifier in your database cache; >1000 --> <desc>Germany topographic maps (vector based)</desc> <credits><![CDATA[<a href="http://www.geodatenzentrum.de">geodatenzentrum.de</a>]]></credits> <url><![CDATA[http://sg.geodatenzentrum.de/wms_webatlasde__[INSERT YOUR ID HERE]?STYLES=]]></url> <minzoomlevel>1</minzoomlevel><!-- 0 to 20 --> <maxzoomlevel>17</maxzoomlevel><!-- 0 to 20 --> <version>1.1.1</version><!-- do not change --> <layers>webatlasde</layers> <coordinatesystem>EPSG:4326</coordinatesystem><!-- do not change --> <format>image/png</format> <cache>1</cache><!-- not in use --> </wms> <wms> <name>Denmark Vector</name> <uid>6601</uid> <desc>Denmark topographic maps (vector based)</desc> <credits><![CDATA[<a href="http://www.kortforsyningen.dk">kortforsyningen.dk</a>]]></credits> <url><![CDATA[https://services.kortforsyningen.dk/service?SERVICENAME=topo_skaermkort&styles=&jpegquality=80&styles=&exceptions=application/vnd.ogc.se_inimage&login=[USERNAME]&password=[PASSWORD]]]></url> <minzoomlevel>7</minzoomlevel> <maxzoomlevel>20</maxzoomlevel> <version>1.1.1</version> <layers>dtk_skaermkort</layers> <coordinatesystem>EPSG:4326</coordinatesystem> <format>image/jpeg</format> <cache>1</cache> </wms> <wms> <name>Netherlands Topographic</name> <uid>6602</uid> <desc>Netherlands topographic maps</desc> <credits><![CDATA[<a href="http://geodata.nationaalgeoregister.nl/">geodata.nationaalgeoregister.nl (observe fair-use principle!)</a>]]></credits> <url><![CDATA[http://geodata.nationaalgeoregister.nl/top10nlv2/wms?&STYLES=]]></url> <minzoomlevel>14</minzoomlevel> <maxzoomlevel>20</maxzoomlevel> <version>1.1.1</version> <layers>top10nlv2</layers> <coordinatesystem>EPSG:4326</coordinatesystem> <format>image/png</format> <cache>1</cache> </wms> </wms_services>
I did not try to mimick the mapsources for MOBAC that accumulate different layers for different zoom levels, like Denmark or the Netherlands. For these countries I only included the basemaps. If you want the layers I did not include, it should not be too difficult to figure it out from the sources I provide above.
The only mapsource I could not include in the files was SwissTopo, since it requires basic authentication and the wms_services.xml does not support the httpparam tag as it seems, so I cannot pass the Authorization header like with MOBAC. However, you can still add the source in OruxMaps directly. Just navigate to the list of maps and tap on “WMS” on the top. Enter the following values:
- WMS URL: wms.swisstopo.admin.ch/?
- https: Set tickmark
- http basic authentication Username/Password: Enter the data you received after registration
- Click on OK and select the layer “Landeskarten (farbig)” → will result in “CH.SWISSTOPO.PIXELKARTE-FARBE”
- Minimum/maximum zoom levels: 8/16
- Additional WMS parameters: &TRANSPARENT=true&STYLES=&EXCEPTIONS=application/vnd.ogc.se_inimage
- Decide upon a mapname and set the two tickmarks as you like.
That’s it – works like a charm.
Appendix: Some Hints on Editing the Ruleset
What to Show
When I decided what to show on my map and what not, I used the list of map features from OSM and went through it. A lot of work, but you need to do this only once. With WebAtlasDE, some features are already in the map, so no need to render them again in the OSM layer. Once in a while I come to the conclusion that I miss a feature in my maps, then the feature list is the way to find out what to map.
Fine Tuning
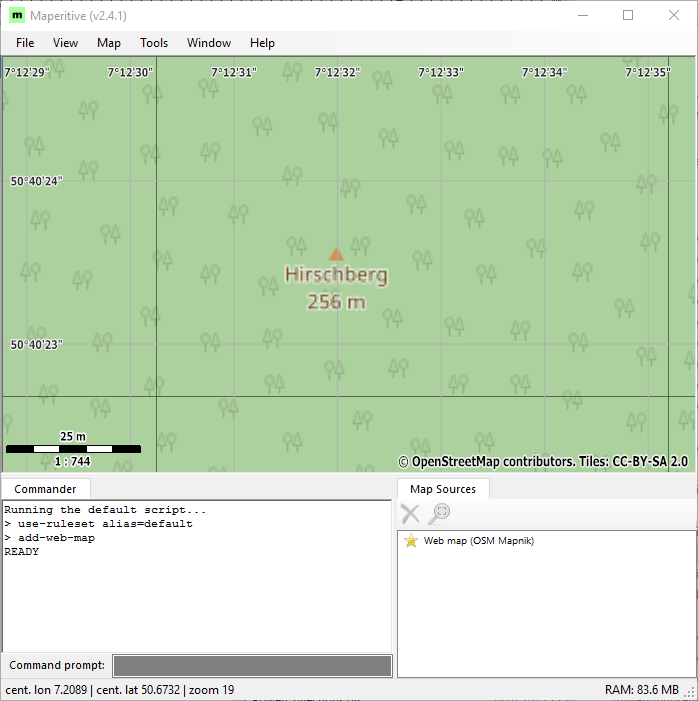
When I made the ruleset, I often found examples where the rendering did not meet my expectations. In such cases, I analyzed how the specific location was mapped in OSM in order to optimize the features section in the rules, i.e. how a location is classified for later rendering. Here’s an example from the teaser map above – the ruins on the Hirschberg:
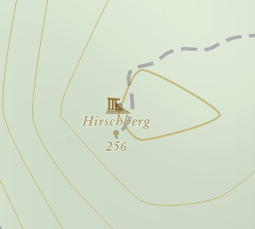
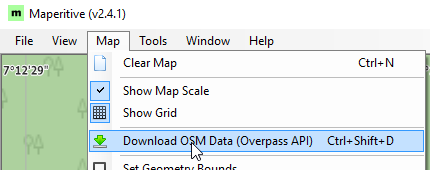
They are shown with the generic ruins icon. But I suspect them to be castle ruins, since a closeby place is named Hirschburg, and “Burg” means castle. What I do in such a case is to run Maperitive and navigate to the location:
Now I download the OSM data for the region:
Make sure that you really only select the part of the map that contains the object in question and not much more, because we need to locate the data in the downloaded file in a minute – so: the shorter the OSM data file, the better. In the commander-window you’ll see the URL and query that was submitted to the Overpass API:

I now take the whole URL/query – in the example:
http://overpass-api.de/api/interpreter?data=(node(50.6728354184931,7.20798507709586,50.6735476476259,7.20985189457023);rel(bn)->.x;way(50.6728354184931,7.20798507709586,50.6735476476259,7.20985189457023);node(w)->.x;rel(bw););out;
– and paste it into my web browser. It will download the OSM data, which I then open in a text editor. In the example it’s rather short:
<?xml version="1.0" encoding="UTF-8"?>
<osm version="0.6" generator="Overpass API">
<note>The data included in this document is from www.openstreetmap.org. The data is made available under ODbL.</note>
<meta osm_base="2017-06-03T20:22:23Z"/>

  <node id="259103363" lat="50.6732111" lon="7.2088873">
    <tag k="ele" v="256"/>
    <tag k="name" v="Hirschberg"/>
    <tag k="natural" v="peak"/>
  </node>
  <node id="259103364" lat="50.6734019" lon="7.2089084">
    <tag k="ele" v="260"/>
    <tag k="historic" v="ruins"/>
    <tag k="image" v="http://commons.wikimedia.org/wiki/File:Hirschbersgrp.jpg"/>
  </node>
  <node id="2291913110" lat="50.6732777" lon="7.2088477">
    <tag k="man_made" v="survey_point"/>
  </node>

</osm>
You can see that the location is tagged historic=ruins. And there’s a link to an image. After a little research you find out that it was an observation tower once, not a castle. So, in this case no need to adjust the rules, since the generic ruins icon is correct. But using this method I fine-tuned the rendering rules.
As an example what the result is, here my selection rules for the target “baum” (= tree):
baum : natural=tree AND NOT (leaf_type=broadleaved OR leaf_type=needleleaved) AND (denotation=natural_monument OR tourism=attraction OR @isMatch(name, ".*")) AND NOT @isMatch(end_date, ".*")
You may wonder why it’s so complicated. The reason is that some very active OSM mapper mapped really each and every single tree in Troisdorf and the surrounding villages (actually you can meet the guy on the Bonner OSM Stammtisch). In the beginning, my target just looked like this:
baum : natural=tree AND NOT (leaf_type=broadleaved OR leaf_type=needleleaved)
So “baum” was everything that was not explicitly a needleleaved or broadleaved tree, i.e. the unspecific, generic tree. But Troisdorf was just a mess! Trees all over the map, you could not see anything else! What I wanted in my map were trees that were remarkable, outstanding trees. And such trees are usually tagged with denotation=natural_monument or tourism=attraction, or they have a name (hence @isMatch(name, “.*”)) – which I found out examining some special trees well known to me with the method above.
So I thought: Now I’m happy, but yet again: I had an outstanding tree in my map, but when I went there: No tree! What was wrong? Using the method above again I realized that the tree had an end date in OSM – in other words: At some point it died and was removed. So now I only render trees that have no enddate (NOT @isMatch(end_date, “.*”)).
Final Remarks
Thanks to the authors of Greenshot which I used to take the screenshots shown here!
I make use in this post of data from OpenStreetMap. The data is made available under ODbL. Thanks to all contributors (which includes me :-))!